Which neodymium ring magnet fits a 2 mm leather case

Use a ring magnet sized to match your phone mount and case. Choose a size and grade based on phone weight, mount style, and how much adhesive or lining you add. Manufacturer pull-force charts show how size, grade, and gap change holding strength. See K&J Magnetics and MagnetShop data and Apple MagSafe guidance cited below.
On this page (10 sections)
- Remember this
- Pick dimensions to match your phone and mount
- How magnet grade affects pull force
- Why pull force charts matter and how to read them
- Translate pull force to real-world holding needs
- Embedding method and adhesive choices change effective strength
- Wireless charging and magnetic interference
- Practical design checklist before you buy
- Examples and how to verify seller claims
- FAQ
Part of our guide on car mount holding phone in thick case
Fast facts
- Typical outer diameter range
- 18–25 mm depending on mount and clearance
- Typical inner diameter range
- 8–12 mm to avoid camera cutouts
- Typical thickness range
- 2.5–4 mm depending on grade and leather strength
- Pull-force depends on size, grade, and gap
- See manufacturer charts (K&J Magnetics, MagnetShop)
- Leather thickness
- 2 mm base case in this guide
Remember this
- Pick diameter to clear cameras and match your mount. Measure the phone and mount plate.
- Magnet grade changes pull force. N52 gives stronger pull than N42 for the same size.
- Adhesive thickness and lining increase the magnetic gap and reduce holding force.
- Check manufacturer pull-force tables for specific sizes and grades before you buy.
- Magnets can affect Qi and MagSafe charging. Follow WPC and Apple guidance for placement and testing.
Pick dimensions to match your phone and mount
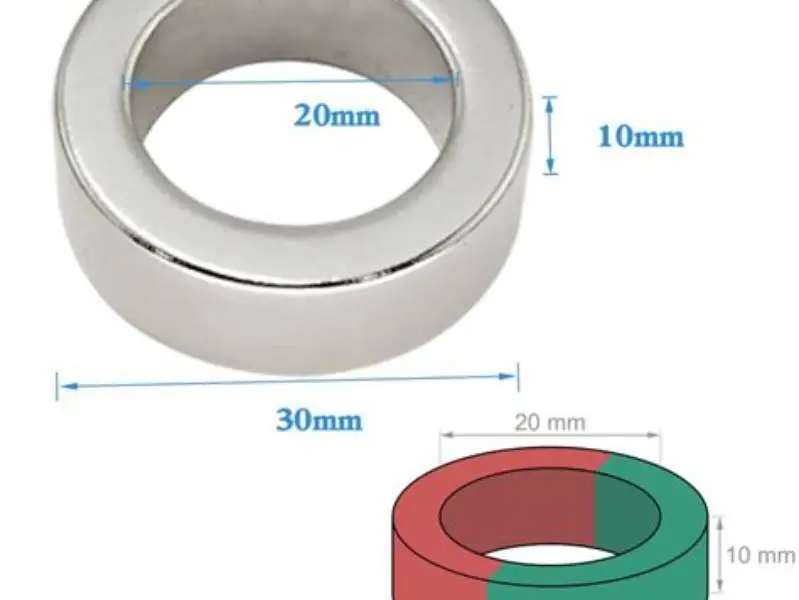
Measure the phone area that will contact the magnet. Measure the mount or mount plate too. You must avoid cameras and buttons.
Choose an outer diameter that fits the case pocket and aligns with the mount ring. Common ring sizes sold for phone mounts fall in the 18 to 25 mm outer-diameter range. That range covers most MagSafe-style plates and third-party ring plates. See product listings and dimensions from suppliers such as K&J Magnetics and MagnetShop for exact sizes.
Pick an inner diameter large enough to clear camera islands and not weaken the ring shape. Common inner diameters sit around 8 to 12 mm. If your phone has a camera cluster in that area, increase the inner cutout and verify fit with a paper template.
Use a caliper to confirm case thickness and phone planarity at the embedding spot. If pockets, linings, or stitching change the effective gap, measure them too. Before you commit to anything, it is worth looking at vent mount prevents phone rotation.
How magnet grade affects pull force
Neodymium magnets come in grades such as N35, N42, N52. The grade reflects the maximum energy product. Higher grade means stronger field for the same volume.
Compare two identical-size rings. The N52 ring will give a higher pull force than the N42 ring. Manufacturer pull-force charts quantify this difference. K&J Magnetics and MagnetShop list pull force or flux density for many sizes and grades.
Do not assume grade alone solves a weak hold. Size and gap remain the dominant factors. A larger N42 can outperform a tiny N52. Use the charts to compare realistic, tested pull-force numbers for the exact geometry and grade you plan to use. We go through keeping phone secure with magsafe charger step by step elsewhere on the site.
Why pull force charts matter and how to read them
Pull force is measured with a magnet flush against a thick steel plate. The test gives a maximum force for that material and contact condition. Real-world phone assemblies are different. Leather, cases, and adhesives create a gap and reduce measured pull force.
Manufacturer tables often include pull force vs gap or pull force for different grades. Find the row that matches your ring geometry and grade. Then check how pull drops with a 1 mm, 2 mm, or larger gap.
For example, K&J provides pull-force tables and calculators you can use to model the loss at typical gaps. Use those numbers to choose a size or grade that gives the required hold after adding your leather and adhesive thickness. The other half of this decision is iphone 15 pro max magnetic holder.
Design the ring to your phone, use manufacturer pull-force data for your grade and gap, and prototype to validate both hold and wireless charging.
Translate pull force to real-world holding needs
Phone weight, mount type, and expected shocks set how much hold you need. A light phone clipped to a car vent needs less pull than a heavy phone on a motorcycle mount.
You must test for your use case. Hold requirements vary. Use a spring scale or a pull test rig to measure the force needed to dislodge your phone from your intended mount orientation and motions.
Manufacturer pull-force numbers give a starting point. Add a safety margin for shocks and vibration. Many installers choose a magnet and grade where the manufacturer pull force minus expected gap losses still exceeds the measured dislodge force by a factor of two for high-vibration uses.
Embedding method and adhesive choices change effective strength
Adhesives and linings add thickness. Each added layer increases the magnetic gap and lowers pull force. Measure adhesive thickness after cure, not before.
Use thin two-part epoxy or thin structural adhesive for the strongest bond and the smallest cured gap. Gap-filling adhesives increase distance. Cyanoacrylate glues bond fast but can leave a thin cured layer and are brittle on flexing leather.
Counterbore the leather pocket so the magnet sits flush or slightly recessed. A tight, close fit keeps the magnet close to the phone and reduces flex that can fatigue the leather. Reinforce stitching around the pocket if your case design concentrates stress there.
If you glue to an inner lining rather than embed, use an adhesive specified for metal-to-leather bonding. Test samples for flex resistance and aging. Verify temperature limits for the adhesive; neodymium magnets can demagnetize above certain temperatures and adhesives can soften.
Wireless charging and magnetic interference
Qi wireless charging uses a tuned coil system. Magnets and ferrous metal near the coil change the coupling and detune the resonance. That causes reduced charging efficiency or no charge.
Apple documents that external magnets and metal accessories can affect MagSafe and wireless charging alignment and that the accessory must meet their "Made for MagSafe" guidelines. Apple also gives placement guidance. See Apple's MagSafe documentation for details.
The Wireless Power Consortium publishes the Qi standard and technical notes on foreign object detection and interference. These documents describe how ferrite, metal, and magnets change coil impedance and detection circuits.
You must test charging after embedding. Place the phone in its case on your wireless charger and record charging current, temperature, and whether charging starts reliably. If you see dropped charging or slow current, move the magnet away from the coil area or add a ferrite spacer to redirect flux. Suppliers of wireless accessories sell thin ferrite sheets designed to improve magnetic coupling when metal is present.
Practical design checklist before you buy
Measure the phone, camera cutouts, and mount plate. Calculate the ring outer and inner diameters that clear features and align with the mount.
Decide how close the magnet will sit to the phone after adhesives and linings. Add those layers to your gap estimate.
Pick a magnet grade and size. Use manufacturer pull-force tables and the estimated gap to predict the final pull force. Choose a magnet whose listed pull force minus gap losses meets your required hold with a safety margin.
Plan the embed: countersink depth, adhesive type, and any reinforcing stitching.
Test a prototype. Attach the magnet in the leather, mount the phone, and run hold and charging tests under expected motions and temperatures.
- Measure phone contact area and case features
- Estimate final magnetic gap including adhesives and lining
- Consult manufacturer pull force tables for size and grade at that gap
- Prototype and test for hold and wireless charge
Examples and how to verify seller claims
Do not accept a seller's single-number pull force without a test condition. Ask for the grade, test method, and pull measurement details. Pull force should include the test gap and the test surface.
K&J Magnetics lists pull-force test methods and numbers for their parts. If a seller does not list a comparable data sheet, get a sample and test it yourself or request a datasheet.
If you plan an N42 or N52 ring, ask for the exact part number and grade. Then look up the vendor's pull chart to see the expected force at 0 mm, 1 mm, and 2 mm gaps. That lets you choose with confidence.
FAQ
Can I embed a magnet thicker than 4 mm in 2 mm leather?
You cannot embed a thicker magnet without changing the case structure. Countersink or add a lining to carry thickness. Thicker magnets raise the pocket depth and can stress leather. Consider reinforcing the pocket and checking aesthetics and comfort before final assembly.
Will embedding a magnet stop wireless charging?
It can. Magnets and nearby metal change coil impedance and alignment. Test charging with the final case and magnet in place. If charging fails or runs very hot, move the magnet outside the coil area or add a ferrite sheet per WPC and accessory maker guidance.
How much pull force do I actually need?
It depends on phone weight, mounting orientation, and expected shocks. Measure the force to remove your phone from the mount in your worst-case scenario. Use manufacturer pull-force data to pick a magnet that exceeds that force after accounting for the leather and adhesive gap.
Are ring magnets compatible with MagSafe?
They can be if they match the geometry and field pattern Apple expects. Apple documents MagSafe requirements for accessories. Third-party mounts vary, so match the ring size and test. See Apple’s MagSafe guidance and WPC/Qi notes for alignment and interference information.
Which adhesive should I use?
Use a thin structural epoxy or a dedicated metal-to-leather adhesive for long-term durability and minimal cured gap. Avoid bulky gap-filling adhesives if you want a small magnetic gap. Check the adhesive datasheet for cured thickness and service temperature.